Geeks in Phoenix

Geek Blog


How to safely optimize your solid state drive

Updated September 20, 2020

When it comes to getting the best performance out of your computer, nothing can beat a Solid State Drive (SSD). Right out-of-the-box, they are significantly faster reading / writing data than a Hard Disk Drive (HDD). But there are a few things that you have to do differently with an SSD. Here's how to safely optimize your solid state drive.

The definition of tweak

There are plenty of articles out there that will give you a ton of different tweaks you can use to speed up the SSD access time, from turning off disk indexing to disabling Prefetch and Superfetch. Some may work for you; some may not. Generally speaking, if you're running Windows 7 or higher, the operating system should recognize the SSD and modify its behavior accordingly. The following tweaks are entirely safe and will not harm your system in any way.

General SSD maintenance

SSDs operate differently from HDDs, and there are a couple of things you should never do to an SSD. Since SSDs have limited read/write cycles, any program that intensively accesses the SSD could shorten the drive's life span. Running a disk defragment program on an SSD is not recommended. And as far as Check Disk (CHKDSK) is concerned, you'll need to contact the manufacturer of your SSD to find out if they recommend it or not.

Microsoft started building in support for SSDs in Windows 7 / Windows Server 2008 R2 and has expanded on it in Windows 8 / 8.1 & Windows Server 2012. Since the low-level operation of SSDs is different from HDDs, the Trim command was introduced to handle delete/format requests. To verify that Trim is on, you'll need to open an Administrative Command Prompt.

How to open a Command Prompt with Administrator privileges in Windows 7

How to open a Command Prompt with Administrator privileges in Windows 8

How to open a Command Prompt with Administrator privileges in Windows 10

You can verify that Trim is enabled by typing the following into an Administrative Command Prompt:

fsutil behavior query DisableDeleteNotify

If the command returns a 0, then Trim is enabled. If it returns a 1, then it is not. To enable Trim, type the following into the Admin Command Prompt:

fsutil behavior set DisableDeleteNotify 0

SSD free space maintenance

SSDs do have one downside; their capacity can be smaller than HDDs. The capacity of SSDs is getting closer to HDDs every day, but the price for a 1 to 2TB SSD can be kind of expensive. If you have a smaller capacity SSD, maintaining an adequate amount of free space is necessary.

Now there are two scenarios for setting up computers with SSDs: Single-drive (SSD only) and Multiple drives (SSD + HDD). Laptops are usually single-drive, and desktops are almost always multiple-drive. Here are a few ways to maintain free space.

Single-drive (SSD only)

The options here are limited. You could store your files like documents, photos, and music to an external drive or the cloud to free up space. Here are a few more ideas.

Turn off Hibernation.
With the speed of an SSD, boot times will be relatively faster than with an HDD. You'll find that you can boot your computer just as fast as if you brought it out of hibernation. And since hibernation writes the system memory to disk, you'll free up the same amount of disk space equal to the total system memory. And if you have a lot of memory, this can free up a big chunk of space on your SSD.

Disable Windows hibernation and free up disk space

Turn off the virtual memory/pagefile.
Use this with caution! Technically, virtual memory is used when all of the system memory is full. If you have a large amount of system memory (16GB or more) and you don't run memory hog software like Photoshop, you should be alright disabling it. And you'll free up a few GB's of drive space in the process.

Managing Virtual Memory / Pagefile in Windows 7

Managing Virtual Memory / Pagefile in Windows 8

Managing Virtual Memory / Pagefile in Windows 10

Clean up the drive regularly.
Temporary files and browser caches are a few items you'll need to keep an eye on. Using a program like Piriform's CCleaner or Disk Cleanup that comes with Windows will take care of these files. Disk Cleanup can also be run as a scheduled task.

Free up more disk space with Windows 7 Disk Cleanup

Clean up your hard drive in Windows 8 with Disk Cleanup

Clean up Windows 10 with Disk Cleanup

Clean up and optimize your computer for free with CCleaner

Multiple-drive (SSD + HDD)

This is the optimal setup. Everything under a single-drive scenario applies here. Windows and program files need to be on the SSD. Almost anything else that Windows doesn't require for regular operation can go over to the HDD.

Move the virtual memory/pagefile.
Instead of turning it off, move it to the HDD (see link above).

Move personal files to HDD.
Your documents, photos, and music can take up a large amount of space on your drive. Get them off of the SSD and over to the HDD.

Modifying the default locations of user files and library properties in Windows 7

Modifying the default locations of user files and library properties in Windows 8

Modifying the default locations of user files and library properties in Windows 10

There are plenty of other tweaks you can do, like moving the location of your browser cache and temp folders to the HDD. You can find all of that information and more with a quick search on Google.

Be the first to rate this post

  • Currently .0/5 Stars.
  • 1
  • 2
  • 3
  • 4
  • 5

Create great graphics with Paint.NET 4.0

Updated August 29, 2023

Note: This article was based on Paint.NET version 4. Since this article was written, Paint.NET version 5 has been released. Click here to read the newer Paint.NET 5 article.

One of the things I like to do besides repairing computers is creating graphics. Over the years, I have used many different image editing programs, including Photoshop and CorelDraw. But for free graphics programs, you just cannot beat Paint.NET.

Lately, I have been back through some of my older articles and updating the content. Even though I wrote this article a few years ago, Paint.NET is still one of my favorite graphics programs. And it just keeps getting better all of the time.

The user interface inside of Paint.NET 4

Paint.NET was initially created to replace the Paint program included in Windows but has evolved in to so much more since then. It includes such features as layers, effects, transparency, blending, and best of all, plugins.

With hundreds of plugins available, you can expand on the out-of-the-box graphic capabilities of Paint.NET. Since I have a digital camera that will take photos in RAW format, I found a plugin that opens that type of file. I also use Photoshop and have found a plugin to open those files too.

Paint.NET uses an asynchronous, fully multithreaded rendering engine and supports hardware acceleration via the GPU (Graphics Processing Unit). Selections are anti-aliased, and selected outlines rendered with 'dancing ants' animation, significantly improving the contrast between the sample and image. And the user interface is clean and straightforward to use.

The Settings dialog box inside of Paint.NET 4

There are now two (2) versions of the Paint.NET program. The original Windows desktop version and the UWP (Universal Windows Platform). The Windows desktop version is available for download for free from the dotPDN website. The UWP version is available for purchase from the Microsoft Store.

Paint.NET system requirements

  • Windows 10, Windows 8.1, or Windows 7 SP1 with platform update
  • .NET Framework 4.7.2
  • 1 GHz processor (dual-core recommended)
  • 1 GB of RAM

For more information on Paint.NET, follow the links below:

Get Paint 4
What's new in Paint.NET

Currently rated 5.0 by 1 people

  • Currently 5.0/5 Stars.
  • 1
  • 2
  • 3
  • 4
  • 5

How to upgrade your computers hard disk drive to a solid state drive

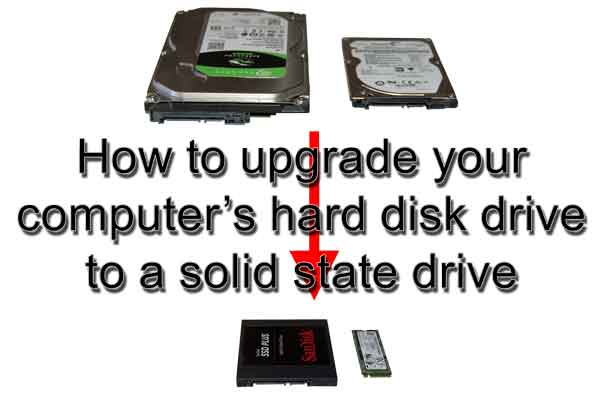
Updated September 10, 2024

There are some computers out there that still use a Hard Disk Drive (HDD) for storage and could be upgraded to a Solid State Drive (SSD). Each drive type has pros and cons: HDDs are cheaper and have more storage, but SSDs are extremely fast (especially when connected to an M.2 slot). So, if your existing computer has an HDD, odds are you could replace it with an SSD. Here's how to upgrade your computer's hard disk drive to a solid-state drive.

How to upgrade your computer's hard disk drive to a solid state drive

I wrote an article not long ago on how to upgrade the hard drive in your computer and refer back to it often. It describes how to clone a smaller drive to a larger one of the same type. Since SSDs typically have less storage than HDDs, this time, I'll have to shrink the existing HDD partition(s) down below the capacity of the target SSD before I can clone it.

As in the article mentioned above, the first thing to do is check the existing HDD. Doing this will ensure there are no errors that may prohibit the cloning of the drive.

How to check your drive for errors in Windows 11

How to check your drive for errors in Windows 10

Now we have to start cleaning up the drive. Windows has a built-in tool called Disk Cleanup (cleanmgr.exe) that works well at getting out the clutter. Try using it from an admin command prompt; that way, you'll get more options.

Clean up Windows 11 with Disk Cleanup

Clean up Windows 10 with Disk Cleanup

Since we are trying to get the maximum amount of free space we can, we will have to delete some files, including documents, photos, videos, etc. Doing a backup right now will ensure we have a copy of all the files if we need to recover some later.

How to backup your Windows 11 computer using Windows Backup

How to backup your Windows 10 computer using Windows Backup

The next thing we have to do is find out what is taking up space on the existing HDD. For this, I'll use a copy of Space Sniffer. After a quick look, I see that I can free up several gigabytes of space by permanently removing the hibernation file and temporarily deleting the swap file. Windows will warn you about having no swap file, but we will be recreating the swap file once the drive cloning is complete.

Disable Windows hibernation

How to manage Windows 11 Virtual Memory

How to manage Windows 10 Virtual Memory

The next thing we need to do to the drive is to defragment it. For this task, I'll use the built-in Defrag and Optimize Drive app.

How to defragment and optimize your drive in Windows 11

How to defragment and optimize your drive in Windows 10

If the capacity of your drives match

If the capacity of your old drive and new drive are the same capacity, you are ready to clone your drive. The following link has instructions and links to the software to do it.

How to clone the drive in your Windows computer

Once you have your old drive cloned to the new one and you have swapped them out, go ahead and re-enable the swap file. Re-enabling hibernation is a personal choice.

If the capacity of your drives do not match

If the capacity of your old and new drive differ, you will have to manually resize the Boot partition (C: drive). Right-click on the Start Windows logo button to bring up the Power User menu and select Disk Management. Here you will find all of the drives currently attached to your computer.

If you have more than one drive attached to your computer, you will need to determine which drive has the operating system. This drive will usually have three partitions: EFI System Partition, Boot Partition and Recovery Partition.

Once you have located the correct drive, you need to check the partition structure. The EFI System Partition is always the first partition (the start of the drive) on the left side of the graphical view of the drive, with the Boot Partition in the middle and the Recovery Partition on the right side (the end of the drive). If you have more than one partition behind the Boot Partition, you will need to contact a computer technician to assist with the upgrade.

Since we need to resize the Boot Partition (C:\ drive), you will need to disable and remove the Recovery Partition and recreate it after the drive has been upgraded. This can only be done using an Administrative Command Prompt.

How to open a Command Prompt with Administrator privileges in Windows 11

How to open a Command Prompt with Administrator privileges in Windows 10

When you have an Admin Command Prompt open, type the following to find the location of the Windows Recovery Environment (WindowsRE) boot image and press Enter.

reagentc /info

Take note of the harddisk# and partition#. Then, type the following to disable the WindowsRE boot image and press Enter.

reagentc /disable

Then type the following and press Enter. This will bring up the command-line version of Disk Management.

diskpart

Then type the following to list all of the disks attached to your computer and press Enter.

list disk

To select the disk with the Recovery Partition, type the following and press Enter. This should be the same harddisk number that you made note of earlier.

sel disk #

To select the Recover Partition, type the following and press Enter. This should be the same partition number that you made note of earlier.

sel part #

To delete the WinRE partition, type the following and press Enter.

delete partition override

If your old drive is larger than your new drive, you will need to shrink the Boot Partition. To do this, open Computer Management, expand the Storage section in the left column and select Disk Management. In the right column, right-click on the partition marked as Boot (usually C:) and select Shrink. Remember to take the size down at least 10-15% below the capacity of the new SSD.

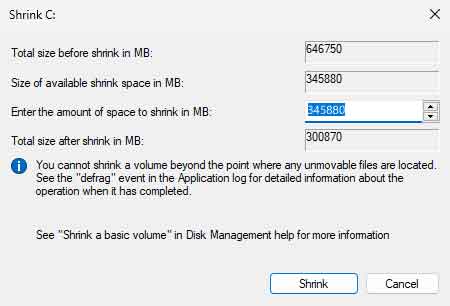
Shrinking a partition down in Windows

Once the partition has been resized, it's time to clone the drive. The following article details how to clone your hard drive, including links to the cloning software.

How to upgrade the hard drive in your computer

Note: An issue not addressed in the article above is the form factor; the existing SATA HDD is 3.5" form factor, and SATA SSDs are 2.5" form factor.
A SATA SSD installed into a desktop adapter bracket
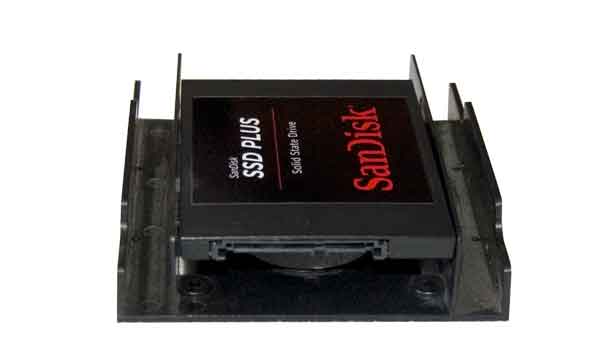
This can easily be resolved by using a 2.5" to 3.5" adapter bracket.

Once the drive cloning is complete, and the system is running again, we need to expand the boot partition to use any free space available. Open Computer Management, expand the Storage section in the left column and select Disk Management. In the right column, right-click on the partition mark as Boot (usually C:) and select Expand. Make sure to leave 1GB of space at the end for the Recovery Partition.

To recreate the Recovery Partition, you will need to open an Admin Command Prompt. At the prompt, type the following and press Enter.

diskpart

First thing you need to do is check if the disk partition style is a GUID Partition Table (GPT) or a Master Boot Record (MBR). To do that, type the following and press Enter. Check if there is an asterisk character (*) in the Gpt column. If there is an asterisk character (*), then the drive is GPT. Otherwise, the drive is MBR.

list disk

If your disk is GPT, type the following and press Enter.

create partition primary id=de94bba4-06d1-4d40-a16a-bfd50179d6ac

Then type the following and press Enter.

gpt attributes =0x8000000000000001

If your disk is MBR, type the following and press Enter.

create partition primary id=27

Once the partition has been created, you will need to format it. Type the following and press Enter.

format quick fs=ntfs label=”Windows RE tools”

To confirm that the WinRE partition is created, type the following and press Enter.

list vol

To exit from diskpart, type the following and press Enter.

exit

To re-enable WinRE, type the following and press Enter.

reagentc /enable

If for any reason the WindowsRE fails to re-enable the Recovery Partition, an in-place upgrade will rebuild the Recovery Partition.

How to perform a repair upgrade of Windows 11

How to perform a repair upgrade of Windows 10

Once the boot partition has been resized, you can enable the Windows swap file. For more information on upgrading computer drives, click on the following links.

How to clone the drive in your Windows computer

How to upgrade the hard drive in your computer

Be the first to rate this post

  • Currently .0/5 Stars.
  • 1
  • 2
  • 3
  • 4
  • 5

Clean up your Internet browser with AdwCleaner

Updated September 5, 2024

I've been doing virus/malware removal for a while now and have seen many different types of infections. The latest trend is to target your Internet browser. Whether it is Chrome, Edge, Firefox, or Safari, it can get compromised. One of the best programs I've found to clean up Internet browsers is AdwCleaner by Malwarebytes.

The main screen inside AdwCleaner

Browser exploits have been around for a while now. Who hasn't had their home page changed or had a mysterious toolbar appear when they opened their browser? AdwCleaner is the perfect tool for getting all that junk out of your browser(s).

The settings screen inside AdwCleaner

AdwCleaner works great for removing adware, PUPs (Potentially Undesirable Program), unwanted toolbars, and home page hijacking. It can also clean up all Internet settings and reset your network adapter(s) back to their default state. With its intuitive interface and powerful scanning capabilities, AdwCleaner has gained widespread popularity among individuals and IT professionals alike. Here is a list of Adwcleaner's key features:

  • Comprehensive Scanning: AdwCleaner employs advanced algorithms to thoroughly scan your system for adware and PUPs, targeting areas where these unwanted programs typically reside, such as browser extensions, registry entries, and system files.
  • User-Friendly Interface: The interface of AdwCleaner is designed to be user-friendly and straightforward, allowing users to initiate scans and easily remove detected threats. The simplicity of the tool makes it accessible to both novice and experienced users.
  • Quarantine and Restore: Upon detecting adware and PUPs, AdwCleaner provides users with the option to quarantine and remove the identified threats. Additionally, the tool allows users to review and restore any items that have been mistakenly flagged as unwanted.
  • Frequent Updates: To keep pace with the evolving threat landscape, Malwarebytes regularly updates AdwCleaner to ensure that it can effectively detect and remove the latest adware and PUPs.

AdwCleaner is a stand-alone program (requires no installation) except for the quarantine folder and a few registry entries it creates. Just download it to your computer, and you are ready to go. And you can uninstall it right from the main user interface. Best of all, it's free.

AdwCleaner from Malwarebytes is a formidable weapon in the fight against adware and PUPs. Its ease of use, powerful scanning capabilities, and the backing of a reputable cybersecurity company make it a go-to choice for individuals and professionals seeking to keep their systems free of unwanted software. As adware and PUPs continue to pose threats to computer users worldwide, AdwCleaner remains a crucial tool in maintaining a clean and secure computing environment.

For more information on AdwCleaner, follow the link below.

Malwarebytes AdwCleaner

Currently rated 2.3 by 3 people

  • Currently 2.3/5 Stars.
  • 1
  • 2
  • 3
  • 4
  • 5

How to spot a piece of spam e-mail

Updated August 19, 2024

With the increasing amount of spam flooding into our inboxes daily, it's essential to be able to discern between legitimate e-mails and spam. Spam e-mails can be annoying, deceptive, and even dangerous. Identifying and handling spam e-mails can help protect your personal information and keep your inbox clutter-free. Here are some tips on how to spot a piece of spam e-mail.

How to spot a piece of spam email

When it comes to spam, I like to break them down into three (3) groups:

  • Junk: Just straightforward advertising
  • Phishing: Trying to get personal information, like login credentials
  • Malicious: Meant to deliver some kind of payload, usually file-encrypting malware

Of all three types of spam e-mail, malicious is the most dangerous, but phishing is the most popular. With the progress in security over the years, malicious spam with attachments has decreased. Scammers now want a quick payday, and bank credentials and gift cards are just a couple of ways they try to get your money. But if you take the time to look at a questionable e-mail, you will be able to determine whether it is or is not spam. Let's look at the different areas of an e-mail.

The From line

The sender's e-mail address (From line) is one of the first things to look at when determining if an e-mail is spam. Legitimate companies will usually have domain-specific e-mail addresses, such as @companyname.com. If the e-mail comes from an unfamiliar or suspicious domain, it's likely to be spam. Additionally, be wary of e-mail addresses that contain long strings of random characters or misspelled variations of well-known domains.

The From line can be easily faked, and you can check it quickly by hovering your cursor over the From line.
The properties of the From field inside of Google Chrome
Do you know the sender? Do you now or in the past done business with that company? If you answered no to both questions, it is probably spam. Also, look for e-mail addresses from domains that provide free e-mail addresses (gmail.com, yahoo.com, etc.) or end with a two-letter extension (@com.uk, @com.ru, etc.). Two-letter extensions are for domains outside America.

Another tactic spammers use is impersonating legitimate companies or individuals. They may use logos, branding, or language that closely resembles that of real organizations to trick recipients into thinking the e-mail is genuine. If you receive an e-mail that claims to be from a familiar company but seems off in any way, it's best to verify the source (phone call) before taking any action.

The To line

This line should contain just your e-mail address. If multiple e-mail addresses are listed, do you recognize any other e-mail addresses? If you don't, it could be spam. And if this line is blank, the odds are it's spam.

The Subject line

Another red flag to look out for is the Subject line of the e-mail. Spam e-mails often use sensational or urgent language to entice you to open them. Phrases like "urgent action required" or "you've won a prize" are common in spam Subject lines. If the Subject line seems too good to be true or overly dramatic, it's best to err on the side of caution and consider it potential spam.

When it comes to the Subject line, if it doesn't sound right, it's not. Spam from other countries is quite often full of grammatical errors. Always remember that if it sounds too good to be true, it probably is. The odds are that the anti-virus/service contract renewal invoice is bogus and that the e-fax scan from a Xerox WorkCentre (notice the spelling) or notice to appear in court that is attached is just a virus.

The e-mail body

The message in the body of the e-mail usually tries to get you scared or angry, and they want to use your emotions against you. But the first thing to remember is do not call any phone number or click on any links in a panic. That is just what they want you to do. Take your time and read the e-mail carefully.

Furthermore, scrutinize the content of the e-mail. Many spam e-mails are rife with spelling and grammatical errors and may contain strange formatting. Legitimate companies usually take care to ensure their e-mails are well-written and professional. If you notice oddities in the language or formatting of an e-mail, it could be a sign that it's spam.

For those spam e-mails that tell you that your bank account has been charged for something you did not order, do not call any phone number listed in the message. As I wrote in the How to handle a tech scam article, the scammer's primary goal is to get your money.

If the e-mail states that you need to verify your login credentials, do not click on the link they put in the e-mail. They are just phishing for your personal information. You can check where the link points to by hovering your cursor over it without clicking.

The properties of a link inside of Google Chrome
Chrome displays the URLs at the bottom of the browser

The properties of a link inside of Microsoft Outlook
Outlook displays URLs next to the link

If you want to be reassured that a particular e-mail is spam, use your usual way of accessing that resource (bank website, credit card website, phone number, etc.). Remember that credit and debit cards usually have a toll-free phone number on the back.

Attachments

Links and attachments in e-mails can also be indicators of spam. Hover your mouse over any links in the e-mail (without clicking on them) to see the actual URL. If the link doesn't match the purported destination or appears suspicious, it's likely a phishing attempt. Similarly, unsolicited attachments in e-mails should be treated with caution, as they may contain malware or other harmful content.

Never open attachments from people you do not personally know. Never. If you receive a questionable e-mail from someone you know but were not expecting, contact them directly (via phone call) and verify they sent you the e-mail with the attachment.

Scammers are notorious for adding fake file extensions to attachments to get you to open them. They know that most e-mail programs hide the extensions of attachments. So what they do is name a malicious file as something like OpenMe.pdf.exe, and the e-mail program will only display OpenMe.pdf.

In some cases, legitimate e-mails may end up in the spam folder due to aggressive filtering by e-mail providers. Therefore, periodically checking your spam folder for misplaced e-mails is essential. However, please exercise caution when reviewing the contents of the spam folder, as it may contain actual spam e-mails alongside legitimate ones.

To further protect yourself from spam, consider implementing spam filters and using a reputable anti-virus program. These tools can help reduce the influx of spam and prevent malicious content from reaching your inbox. You may also consider using an anti-spam program like Mailwasher.

In conclusion, identifying spam e-mails is crucial for maintaining a secure and organized inbox. By paying attention to the sender's e-mail address, subject line, content, links, and attachments, you can effectively spot and avoid falling victim to spam e-mails. Remember to stay vigilant and skeptical when interacting with unfamiliar e-mails, and don't hesitate to report suspected spam to your e-mail provider.

Currently rated 5.0 by 2 people

  • Currently 5.0/5 Stars.
  • 1
  • 2
  • 3
  • 4
  • 5

Free computer diagnostics

Repairing a PC can sometimes be expensive, and that is why we offer free basic in-shop diagnostics. Give one of our professional and experienced technicians a call at (602) 795-1111, and let's see what we can do for you.

Check out our reviews

Geeks In Phoenix LLC, BBB Business Review

Customer service is #1

Here at Geeks in Phoenix, we take pride in providing excellent customer service. We aim to give the highest quality of service  from computer repair, virus removal, and data recovery.

Bring your computer to us and save

Repairing a computer can be time-consuming. That is why we base our in-shop service on the time we work on your computer, not the time it takes for your computer to work! From running memory checking software to scanning for viruses, these are processes that can take some time.

Contact us

If you have any questions, please feel free to give us a call at (602) 795-1111  and talk with one of our Geeks. Or you can send us a message from our contact page , and one of our Geeks will get back to you as soon as possible. Or you can stop by and see us. Here are our hours and location.

Like Geeks in Phoenix on Facebook

Follow Geeks in Phoenix on Twitter

Watch Geeks in Phoenix on YouTube